How do I assemble the other parts of the Konstruktor camera?
Here are the required parts: x1 S3 Screw, A10, B7, B13, B
Here is the technical diagram

Part required for the Rewind Key

Connect A10 and B7 – Then screw S3 into the top to hold them together

Place B13 onto the light chamber with the Matt surface face down

Note the little lip of the sheet – this should match up with the lip on the light chamber to fit

Parts Required: x4 S2 Screws, B10, B21, B24, P12, B25, B26
Here is the technical diagram

Here are the parts required for the next steps

Attach parts B10 and B24 as shown in technical drawing

Here is the technical diagram showing the next steps
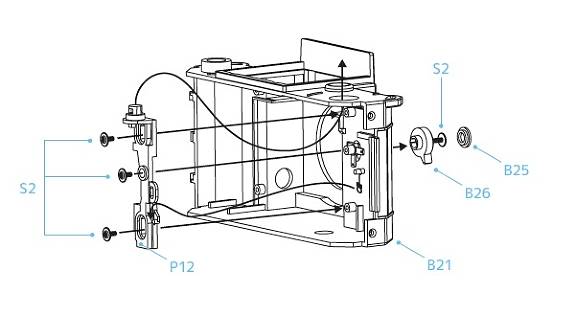
Attach P12 as shown in the technical drawing. As part of this step, you must hook part B10 (the metal part you just attached to the camera body) onto P12; using a needle is a good trick for doing this more fiddly part of the assembling process!
Attach x3 S2 screws into P12 to hold it in place

Add part B26 as shown

Screw x1 S2 screw into B26 to hold it in place

Add B25

Here’s a video on how to assemble the other parts of the camera:
Speed building the Konstruktor:
Visit the Konstruktor microsite or download the Konstruktor Instruction manual here.
You can find the Konstruktor camera in the Online Store.
written on 2013-06-05 in #camera #konstruktor