Dave Prochnow Makes a DIY Instant Pinhole Camera with the LomoGraflok
5 Share TweetWe recently came across film photographer Dave Prochnow's DIY project where he took a LomoGraflok 4×5 Instant Back and used it to create an instant pinhole camera. Free-spiritedness and experimentation are at the core of Lomography's philosophy and love for analogue, so naturally we had to talk with David about his inspirations and process for this DIY hack!
For World Pinhole Photography Day which we celebrate every April 28th, we asked Dave about his curious contraption, what he loves about pinhole photography, and more.


Hi, Dave! Welcome to the magazine. Can you tell us a bit about yourself? When and how did you discover film photography and what keeps you shooting?
My name is David Prochnow and I am the projects editor with DIY Photography. I began using film cameras at a very early age and was immediately captivated by the ability of photography to produce an image that represented an abstraction of the world around me. Whether the photograph was color or black and white, or a transparency, with these results I could "see" things that the human eye was incapable of seeing. I began to experiment with different film formats and built cameras that could enhance my vision.
Yes, I was hooked. In fact, this compulsion for opening my "mind's eye" acts as the primary impetus for continuing to actively pursue photography today.


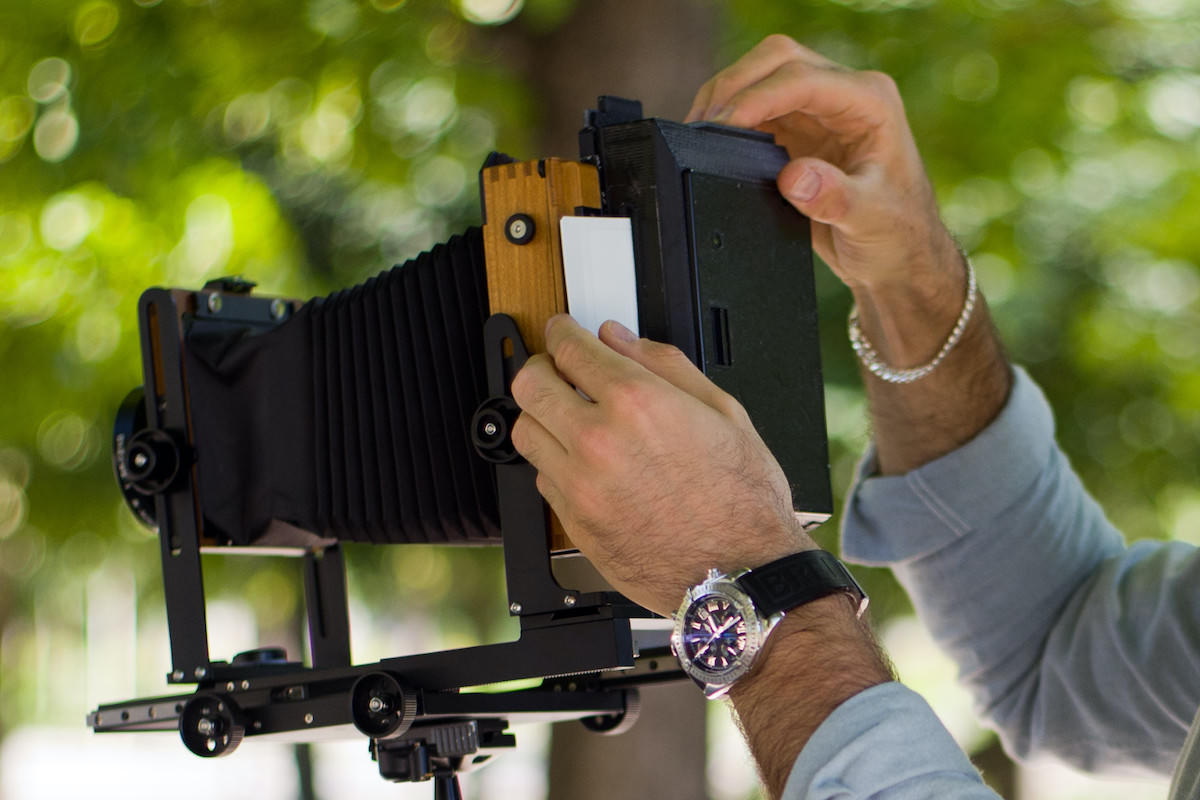
Where did you get the inspiration for creating this DIY instant pinhole with the LomoGraflok 4×5 Instant Back?
Building on this desire to expand my photographic talents, I learned about the fascinating ability of a "lens-less" camera that could project an image onto an opposing surface. If this surface held a piece of film or photographic paper, then an image could be developed. "Whoa; a camera for the masses," I thought! Just a box and a pinhole and voila you had a complete camera system.
Reality soon tamed my enthusiasm, however. Every exposure that I made was awful. Each photo was grossly underexposed. How could I determine the proper exposure?
Coupled with this exposure dilemma was the lengthy amount of time needed for seeing each result. Sure I could make multiple exposures using my light-tight film changing bag for removing exposed film and inserting a new, fresh piece of film, but I'd have to return to my darkroom and develop the film before I knew whether I had actually captured the moment or not.
So, there you have it; two problems that are native to pinhole photography: determining the proper exposure and obtaining developed results. Yes, a digital camera could be used and it would solve both problems, but, to me, I felt that analogue film was the most appropriate medium for creating pinhole photographs.
And, so, my project at DIY Photography – Build a pro-grade instant pinhole camera in less than 5 minutes was born.


Did you face some hurdles while working on this project?
Naturally, building something from two entirely different, disassociated components is going to generate one or more stumbling blocks. The greatest challenge with this project was the presence of an unknown light leak. I used two packs of Instax film before I was able to track down the source of this leak. The culprit was a loose finger joint that was used to assemble the Ilford Obscura exposure box.
Were you surprised with the results?
Once I applied some opaque tape over this joint the light leak thankfully disappeared. Immediately the results were very impressive. Imagine, within seconds, I was able to check the exposure, adjust my composition, and take a final photograph. In my opinion, this was better than a digital solution. Why? Because a beautiful photographic print was in my hand within 90 seconds after tripping the shutter. No lengthy waiting time nor darkroom visit were required.
Do you have a favorite shot taken with this instant pinhole camera?
If you'd like to experiment with the LomoGraflok, just assemble the components following the instructions in the article, mount your crazy-looking camera contraption on a tripod, load your Instax film pack, and hit the road.
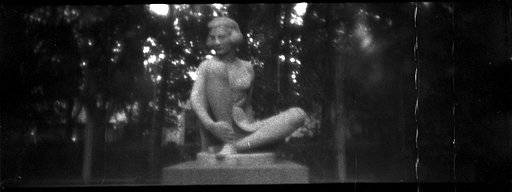
During my extensive testing of this instant pinhole camera, I walked beside a cemetery and imagined a lengthy depth of field (i.e., objects will all be in focus within the photograph from nearby inches to distant tens to hundreds of feet – this is a true "focus-free" camera) between fences, gravestones, and trees in my mind's eye. This image was included in the article as an example of the type of impact that can be made with a pinhole photograph.

Do you have any advice for people who'd also like to try out your pinhole project with the LomoGraflok?
One of the hallmarks of my projects is that they can be built by anyone with any talent level. Similarly, this Ilford Obscura + LomoGraflok combination can be built in less than 5 minutes with some elastic bands, pencils, and tape. That's not too bad when you consider the photographs that will be possible by adding instant film into pinhole photography.
What do you love about pinhole photography?
This "instant gratification" will allow photographers to concentrate on the virtues of pinhole photography rather than being plagued by poor exposures and lengthy darkroom times. A camera without a lens that is capable of taking photographs with a lengthy depth of field sounds almost too good to be true.
Add an instant film back like the LomoGraflok to this pinhole camera, however, and you can see your photograph within 90 seconds after exposure. And that's as good as it gets.


Pinhole photography can be a little bit daunting, especially for anyone who's never tried it before. Do you have any advice for anyone trying it out for the first time?
Typical pinhole cameras can present a barrier of the unknown to the first-time lens-less camera user. Determining the proper exposure, as well as crafting a usable film negative can seem like insurmountable challenges. Simply adding a LomoGraflok onto the pinhole camera can quickly alleviate both of these two barriers, however.
The film is developed within 90 seconds of exposure which enables the perfect exposure to be nailed down within just a couple of prints. Even the most timid pinhole photography beginner will be able to focus on the subject instead of worrying about the result.
Can you share some other experiments you'd like to try out next?
If you'd like to learn more about other upcoming projects, please continue to read DIY Photography. In fact, there are three very interesting projects that are currently in development. While I won't mention any spoilers, I will say that these projects continue to explore the limitless possibilities that are available with Lomography products.
We'd like to thank Dave for sharing his creativity with us!
What are you shooting for World Pinhole Photography Day? Share it with us below!
written by sylvann on 2024-04-28 #gear #tutorials #pinhole #world-pinhole-day #instant #lomograflok #david-prochnow


No Comments